Tutorial of protein-ligand complex simulation in water with Gromacs.
By Quantao, posted on 29, December 2020.
#This is a command-line assembly(extraction code 9999) for Gromacs solution simulation of a protein-ligand complex. This tutorial is based on the tutorial of Justin A. Lemkul, but with modification, with the mind to expand the utility of this tutorial.b (You could download the same tutorial from the above link to read in Sublime for a better reading experience. If you don't have Sublime yet, you can use snap install sublime-text to install).
Four differences between this tutorial and Justin A. Lemkul's tutorial.
1. Justin only shows how to deal with a nice structure, while this tutorial tries to show how to process a structure with a broken backbone or modified residue.
2. Justin shows primarily how to do work in a local machine, while this tutorial tries to expand the logic suitable for both local and remote.
3. Instead of using Avogadro, here we use open babel to prepare small molecules for topology generation, which is easier to install and faster to process.
4. This tutorial does not focus on explaining the principles of molecular dynamics but emphasizes more on process orders in a step-by-step manner.
Note the following $PROTEIN and $lig, or $LIG should be substituted by your protein and ligand name properly. Pay attention to the numbers before
and after the command, which indicates the order and the command environment. If there is a pymol at the end of the command, that means the command should be used inside pymol,if there is a terminal at the end, that means the command should be used inside a bash terminal, so if there is a gromacs that means you should load your gromacs module if you use a remote cluster. If there is a website-1, it means you need to head to the website-1 to download some files. This tutorial only applies to Gromacs with a version greater than 2018.
Commands Environment
1.fetch $PROTEIN_ID # for example, fetch
3htb-------------------------------------------
# 1.terminal
# please set up a function in your ~/.bashrc, by adding
function fetch ()
{wget https://files.rcsb.org/download/${1}.pdb} to the
last line.
2.vim $PROTEIN
#please check and write down the 3-letter name of the ligand, for
example, JZ4 # 2.terminal
If you don't have vim, install by sudo apt install vim.
3.pymol $PROTEIN.pdb
# 3.terminal
If you don't have Pymol, install by sudo
apt install pymol.
4.remove chain B, C,
D
-----------------------------------------------------------
# 4.pymol
#If you only get a single chain, skip step 4.
5.remove solvent
#
5.pymol
6.set seq_view,1
# 6.pymol
#you should see a single lettered
amino acid sequence appears on the screen.
7.select so4, PEG, #click with the shift to select all
other co-factors.
# 7.pymol
These selections differ from
protein to protein.
8.remove sele # 8.pymol
#This deletes all the elements you
have selected.
a.
This
is the point when you decide if you should head to Swiss-Modeler, if your
protein is consistent with no interruption
(there will be a "-" if there is an
interruption in Pymol sequence) in the sequence, that
is good and you can move on to
step9. If there is any broken backbone, please download
the *.fasta from RCSB and paste it to swiss-modeler
to generate
a model.pdb based on the protein itself. Then load that
model.pdb into pymol to align to the original
protein-ligand complex
b.
Just
be careful when you do the alignment, make sure it aligns the model.pdb to your
protein, not the other way round!
Otherwise, the relative position of ligand to protein
will be changed and the whole simulation becomes meaningless, you
should type
something like the greens next in Pymol. align model.pdb, $Protein_clean.pdb,
not align
$Protein_clen.pdb, model.pdb.
c.
Followed
by deleting the original protein, save the ligand with the model protein
together as the clean version of pdb to use
in step 9.
d.
If
there is a modified residue at least 6-7 angstrom away from the pocket, you
could assume that by altering this amino acid
has no or little effect on ligand binding. Download the
*.fasta from RCSB , then please use any text editor
to find and replace
the modified residue to its natural version. For example,
you want to replace a phosphate
Tyrosine (PTR) with tyrosine (TYR)
Next, do the same thing as a, b, c, to use in step 9.
e.
If
your situations you happen to have a modified residue very near your pocket or
even directly involved in binding, you should
Leave it intact, try to find a patch for that residue
when you do the protein topology generation. It will not be discussed here.
9.save as
"$PROTEIN_clean.pdb
--------------------
9.pymol
10.grep $LIG
$PROTEIN_clean.pdb > $lig.pdb
-------------
10.terminal
11. grep -v $LIG
$PROTEIN_clean.pdb > $PROTEIN_clean2.pdb
#11.terminal
# grep -v allow us to delete the ligand, since charmm36-mar2019.ff do not recognize it.
12. download
charmm36-mar2019.ff.tgz
#12.website-1
Website-1 = https://www.charmm.org/charmm/resources/charmm-force-fields/
13 tar -zxvf charmm36-mar2019
-------------------------------------------------------
#13.terminal
14 gmx
pdb2gmx -f $PROTEIN_clean2.pdb -o $PROTEIN_processed.gro
----------------------------- #14.gromacs
15. "1" "1" # Gromacs will ask you to
select an option twice, select 1 for both. #15.gromacs
16. obabel
-ipdb $lig.pdb -omol2 $lig
# the output is on screen, copy it. ----------------
#16.terminal
#if you don't have open babel, you
could install by sudo apt install openbabel
17. touch $lig.mol2
#17 terminal
18. vim $lig.mol2, #use "i" to enter edit mode, paste obabel result. ------------------ #18.terminal
19. download sort_mol2_bonds.pl ------------------------------------------------------- # 19.website-2=
Website-2 = www.mdtutorials.com/gmx/complex/02_topology.html
20. perl
sort_mol2_bonds.pl $lig.mol2 $lig_fix.mol2 # manage the bond orders
-------------
#20.terminal
# if you use a remote server and
you don't have sudo permission to deal with potential
#errors at this step, you could do
it locally and copy the result up to the server.
21. upload $lig_fix.mol2, download "$lig_fix.str"---------------------------------------- #21.website-3=
Website-3= https://cgenff.umaryland.edu/ # you need to register as a free user before you can use it.
22. download cgenff_charmtogmx.py3_nx2.py -------------------------------------------- 22.website-1
#be aware in your
computer, it is not necessarily python3, it is not necessarily
#networkx2, it might
be pyhton2 and networkx1. The website also provides two other
# *py to download.
if you have a networkx3, you need to remove it first and
#install networkx2.3.
23. python3 cgenff_charmtogmx_py3_nx3.py $LIG $lig_fix.mol2 "$lig_fix.str" charmm36-mar2019.ff #23.terminal
#similar to step 20,
if you use a remote server, but you are not allowed to install or
#change the networkx version, please do it locally and copy the result
to the server.
24. gmx
editconf -f $lig_ini.pdb -o $lig.gro
------------------------------------------------ -
24.gromacs
25. touch complex.gro
--------------------------------------------------------------------- -
25.terminal
26. cat Protein_processed.gro > complex.gro
-------------------------------------------------- -
26.terminal
27. vim $lig.gro and copy all "LIG lines"
--------------------------------------------------
27.terminal
28. vim complex.gro, insert "LIG lines" before last line
box vector ----------------------- -
28.terminal
29. vim complex.gro, change the atom numbers at the head of the
file. ------------------------- -
29.terminal
# for example, if the number originally
is 5000, and you added 30 more ligand atoms, now it should be 5030.
30. Insert "; Include ligand
topology
#include "lig.itp"
" to topol.top,
before ";Include water topology"
------------------------------------------30.terminal
31. Insert "; Include ligand
parameters
#include "lig.prm"
" to topol.top,
before "[moleculetype]"
----------------------------------------- -31.terminal
32. Insert "$LIG
1" to topol.top,
under "[molecules]"--------------------------------------------
-32.terminal
#replace lig
with your ligand name for the three green blocks.
33. gmx
editconf -f complex.gro -o newbox.gro -bt dodecahedron -d
1.0 -------------------- -
33.gromacs
34. gmx
solvate -cp newbox.gro -cs spc216.gro -p topol.top -o solv.gro
------------------- -
34.gromacs
35. download ions.mdp
-------------------------------------------------------------------
35. website-2
36. gmx
grompp -f ions.mdp -c solv.gro -p topol.top -o ions.tpr -------------------------- -
36.gromacs
37. gmx genion -s ions.tpr -o solv_ions.gro -p topol.top -pname NA -nname CL -neutral ---- - 37.gromacs
#gromacs will ask
you to choose, choose 15, SOL. SOL means solvents, you could chose
water as well, all the same.
38. download em.mdp
-------------------------------------------------------------------
-38. website-2
39. gmx
grompp -f em.mdp -c solv_ions.gro -p topol.top -o em.tpr ----------------------- - 39.
gromacs
40. gmx
mdrun -v -deffnm em
----------------------------------------------------------- -
40. gromacs
41. gmx make_ndx -f $lig.gro -o index_$lig.ndx ------------------------------------------------ - 41. gromacs
# gromacs will give a list to let you choose. type as next:
> 0 & !
a H*
# choose all atoms but hydrogen.
> q
# save and quit.
42. gmx genrestr -f $lig.gro -n index_$lig.ndx -o posre_$lig.itp -fc 1000 1000 1000 ------- 42. Gromacs
43. Insert "; Ligand position
restraints
#ifdef POSRES
#include "posre_jz4.itp"
#endif " to topol.top
before "; Include water topology" but after what has been
inserted at "step30" ------------43.terminal
#replace the name with your ligand
name for the above green block.
#In this tutorial we
only apply constrains to ligand, you could apply on both ligand and protein,
please read carefully the tutorial of Justin.
44. gmx
make_ndx -f em.gro -o index.ndx
------------------------------------------------------ -- -44. gromacs
> 1 | 13
> q #merge
the "Protein" and "$LIG" # This is purely for the need of later nvt.mdp
45. download nvt.mdp
-------------------------------------------------------------------
-45.website-2
46. vim nvt.mdp, find "tc-grps =
Protein_JZ4 Water_and_ions "
--------------------------
-46.terminal
47. replace Protein_JZ4
with our "Protein_$LIG"
-----------------------------------------
-47.terminal
48. gmx
grompp -f nvt.mdp -c em.gro -r em.gro -p topol.top -n index.ndx -o nvt.tpr------
-
48.gromacs
49. gmx mdrun -deffnm nvt ------------------------------------------------- -49.gromacs
#wait until the
finish usually takes about 5 minutes, depending on your system.
50. download npt.mdp
-------------------------------------------------------------------
-50.website-2
51. vim npt.mdp, find "tc-grps =
Protein_JZ4 Water_and_ions "
--------------------------
-51.terminal
52. replace Protein_JZ4
with our "Protein_$LIG"
-----------------------------------------
-52.terminal
53. gmx grompp -f npt.mdp
-c nvt.gro -t nvt.cpt -r nvt.gro -p topol.top -n index.ndx -o npt.tpr -53. gromacs
54. gmx mdrun -deffnm npt ------------------------------------------------------------------- - --54.gromacs
#wait until the finish usually takes about 5 minutes, depending on your system.
55. download md.mdp
-------------------------------------------------------------------
-55.website-2
56. vim md.mdp, find "tc-grps =
Protein_JZ4 Water_and_ions " --------------------------
-56.terminal
57. replace Protein_JZ4 with our "Protein_$LIG" ----------------------------------------- -57.terminal
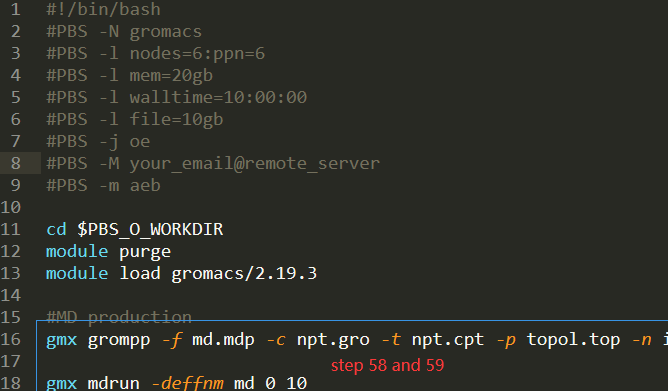
# If you use a local laptop or workstation, you can skip the message next and move on to step 58.
#All the above
command is in interactive mode if you use a remote cluster, for the last
step, a batch mode is preferred, you might
#need to submit a
PBS or whatever script depending on your queue system. A potential job script
might look like the next image.
# If you want to use
the interactive mode, the X2GO client is preferred instead of a direct
SSH connection.
58.gmx grompp
-f md.mdp -c npt.gro -t npt.cpt -p topol.top -n index.ndx -o md_0_10.tpr--------- -
58. gromacs
59.gmx mdrun -deffnm md_0_10 ------------------------------------------------------------------ -59. gromacs.
Wait until it
finishes, based on your CPU numbers, it may take hours or even days to finish
the
job. If you want a
quicker simulation, please modify the md.mdp file to
lower the steps value, maybe just delete some 0.
If you encounter any errors related to the atom numbers in *gro and the topology does not match, that means
You
might have forgotten to modify the topology file in time or you have used a
later produced topology file to do an
earlier job, by accident. The solution is, maybe just start over again, carefully refers to the Justin tutorial and this tutorial.
##################################THE END################################################